

Welcome, to all of you special Lilypadquilting peeps, and to you special blog hop visitors, too! I must warn you . . . I get a little carried away sometimes, and I think this is one of them. When you put me, fabric, my machine, and a camera in the same room? Well, ya had better stand back! (Grin)
Thank you, Madame Samm, for cheerleading for Jane and all of us --- Jane did a great job of organizing this, and I'm thrilled to be participating. Want to see what I made? Do ya? Huh? Well, here you go . . .
Here in all it's 3D spiffiness, is my "Firecracker Block" for your consideration.

Yes, I admit it, I thought we were supposed to make a table topper, so my 12.5 inch block is finished that way. (Grin)
Now, would you like to know how to make one of your very own? Well, sit yourself down (move over, Lilypad regulars, and make some room) and grab a cuppa (we have tea and coffee for you) and make sure you have a snack ('cos it's gonna be a while).
This was my inspiration for this block -- at least, that's what I thought of, and this is the closest image I could find, to show you what was percolating in my wee head.

An old-fashioned fire cracker, right in the middle of explodin'!! So, how to make one? And what to do with it when we're done? I'll show you both!
I rummaged around in my stash and found some patriotic red, white, and blue fat quarters -- but you don't need that much; just scraps will do. I drew a pattern freehand (and if you would like one, just click here to go to my file cabinet over at Google Docs and you can have one!) and cut out my pieces.
Here you see the pieces for the larger half of the firecracker. These will form the outside of the unit:

Now here are the "lining" pieces, that will show because the firecracker is exploding, and the edges of the cylinder that held the powder are being blown back, and will show.

You will see on the pattern a dotted line . . . the lining doesn't have to go all the way inside the firecracker, because it will only show here at the opening.
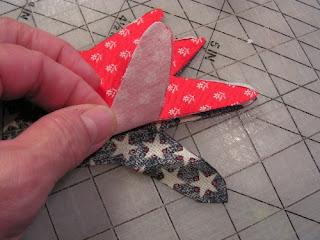
Be careful to flip the pattern pieces over when you cut out the lining, because you will put the pieces wrong sides together, like this:

Here are the pieces that I cut out for the smaller part of the firecracker. I know this may be confusing. Breathe deeply. Relax. Work with me here, OK? It will be alright. (Wink)

This will all become more clear when we start putting things together! And to do that, I found some iron-on Pellon that did the trick. See? Just trace your pattern on here,

Then iron it to the outside or the lining.
And then I used my trusty lapel stick to join the other fabric to the unit.


I didn't worry about the raw edges, because this is supposed to be explodin', ya know! That will just add a little realism!

Now it was time to put the firecracker pieces together and stitch up the tube -- lay them like this and stitch those long sides.
This is what you have now:

I didn't want to be worrying about the lapel stick bond, so I stitched around those edges. This will also make it easier to "curl" the pieces later.
Now, you have to put something in there to plump up this firecracker, and it just so happens that some poly-fil will work nicely, as well as be artsy when we start adjusting things later on, so . . .
Using my handy-dandy-super-specialized-tool, I packed some in there, and left a fair amount hanging out the opening. (Don't you love it when I am so specific about how much of something you should use?)

Now it's time to close up the end. Refer back to the picture above if you need to. You want us to wait? OK, I'll go get another cuppa.
You're back! Take your circle of "outside" fabric and (right sides together) hand-stitch it to the end of the tube. Start on one side, like so:

You can pin it if you like, but just keep going around, turning under about a quarter of an inch, and then you will have this:

It's time to start on the other end of the firecracker, OK?

Put your "outside" and your "inside" or lining fabric together in the same way that we did before:
You can see up above that the Pellon is ironed onto the red fabric, and then I used the Lapel Stick to join the starred fabric to the red.
Second verse, like the first!
I forgot to say that when you stitch the "tube" you should turn and stitch to the edge where it shows that on the pattern:

When you finish stuffing the second one, you'll have two parts that look something like this:

Now it's time to add some embellishments . . .

I pulled out some rick rack, and cut some stars out of another fabric. You can lay the parts of the firecrackers on your block --- oh, I forgot to tell you to cut a 12.5 inch square of fabric, didn't I? Plumb inconsiderate of me, don'tcha know? You can choose whatever you like -- I chose a white on white that I had handy. Lay the firecracker sections out and decide which way you'll be sewing them down . . . but don't do it yet!

Pin your rick rack where you think you will want it; I used mine to make arcs that would show some movement. I laid the block on top of the batting at this point, and sewed the rick rack down.
After that, I did some free motion quilting around those arcs and stars, and when that was done, I made a narrow binding. Here is how it looked when I finished that step:

It was time to attach the firecracker to the block! Using tiny stitches and burying the thread so it would not be seen, I started from the back and stitched that bad boy down.

I wanted to have it almost "pop" off the block, and create shadows, too, so I turned some of the frayed parts under, and stitched those in place. Also, there are some frayed parts that are stitched back onto the firecracker itself, to make it stay "open." See?


I used a needle to gently pull the batting, to make certain that it was thin and wispy, like the smoke from a little explosion. I also added some yellow rick rack to add a little more fiery color:

Padsworth is pointing to the yellow rick rack --- he wants you to admire that:

Here's another close up --- I love how the pieces stand out and have shadows under them!

So, here is the finished project -- my Firecracker quilt block!


I can see using this as a quilt-as-you-go block, and putting four of them together to make an "explosively" colorful wall hanging!
I hope you enjoyed your visit to Lilypadquilting -- it's a hoppening place, and we have a lot of fun here!
Be sure to visit the other bloggers who are offering blocks today:
And be sure to check with Jane at her blog, to get the whole schedule. You can click where it says "Master schedule" to find the whole list! You are sure to be inspired and find lots of new projects to enjoy!
Love,

You're back! Take your circle of "outside" fabric and (right sides together) hand-stitch it to the end of the tube. Start on one side, like so:

You can pin it if you like, but just keep going around, turning under about a quarter of an inch, and then you will have this:

It's time to start on the other end of the firecracker, OK?

Put your "outside" and your "inside" or lining fabric together in the same way that we did before:

You can see up above that the Pellon is ironed onto the red fabric, and then I used the Lapel Stick to join the starred fabric to the red.
Second verse, like the first!
I forgot to say that when you stitch the "tube" you should turn and stitch to the edge where it shows that on the pattern:
When you finish stuffing the second one, you'll have two parts that look something like this:
Now it's time to add some embellishments . . .
I pulled out some rick rack, and cut some stars out of another fabric. You can lay the parts of the firecrackers on your block --- oh, I forgot to tell you to cut a 12.5 inch square of fabric, didn't I? Plumb inconsiderate of me, don'tcha know? You can choose whatever you like -- I chose a white on white that I had handy. Lay the firecracker sections out and decide which way you'll be sewing them down . . . but don't do it yet!

Pin your rick rack where you think you will want it; I used mine to make arcs that would show some movement. I laid the block on top of the batting at this point, and sewed the rick rack down.
After that, I did some free motion quilting around those arcs and stars, and when that was done, I made a narrow binding. Here is how it looked when I finished that step:

It was time to attach the firecracker to the block! Using tiny stitches and burying the thread so it would not be seen, I started from the back and stitched that bad boy down.
I wanted to have it almost "pop" off the block, and create shadows, too, so I turned some of the frayed parts under, and stitched those in place. Also, there are some frayed parts that are stitched back onto the firecracker itself, to make it stay "open." See?
Here is the large section of the firecracker, stitched into place:
I used a needle to gently pull the batting, to make certain that it was thin and wispy, like the smoke from a little explosion. I also added some yellow rick rack to add a little more fiery color:
Padsworth is pointing to the yellow rick rack --- he wants you to admire that:
Here's another close up --- I love how the pieces stand out and have shadows under them!
So, here is the finished project -- my Firecracker quilt block!
I can see using this as a quilt-as-you-go block, and putting four of them together to make an "explosively" colorful wall hanging!
I hope you enjoyed your visit to Lilypadquilting -- it's a hoppening place, and we have a lot of fun here!
Be sure to visit the other bloggers who are offering blocks today:
And be sure to check with Jane at her blog, to get the whole schedule. You can click where it says "Master schedule" to find the whole list! You are sure to be inspired and find lots of new projects to enjoy!
Love,
You lit up the sky with this one! Very cute indeed.
ReplyDeleteVery cool block!
ReplyDeleteWow, wow, and more wows! You are a little creative genius! This is explosively exquisite! And your pictures and tutorial are so detailed...every step. Wonderful contribution to this hop! Yay you!
ReplyDeleteWoww. That is just fantastic. You and Padsworth did a great job.
ReplyDeleteI just love it! And your tutorial is absolutely terrific. I chuckled all the way through it. Congrats on a job well done.
ReplyDeleteWhat a great idea. You are so clever! And it needed to be finished and hanging in your frame. Awesome.
ReplyDelete3 D effect caboom, kazaammmm , wow zee block lol
ReplyDeleteThis is such a cool block. It really does explode. The tut is really detailed, very well done. Thanks
ReplyDeleteAwesome 3d! Love it in the frame :)
ReplyDeleteYou sure do know how to celebrate - love your tutorial and your wonderful finish. Judy C n NC
ReplyDeleteI love this firecracker mini but I am concerned about you, Padsworth. You are getting a bit close, you don't want to cook those cute fingers of yours, especially if there are any French people about. :D
ReplyDeleteTruly wonderful quilt.
Awesome block! I love it!
ReplyDeleteGreat minds do think alike...you and I both made tabletopper fireworks...you have to wait until Wednesday to see mine tho...I'm lovin' yours...great 3d effects!
ReplyDeleteSuper cute! I love the idea of fireworks. What fun!
ReplyDeleteWow its really great - love your tutorial too - might have to have a play sometime! thanks for sharing.
ReplyDeleteSuch a fun block and you really went all out to create it , great tutorial!
ReplyDeleteThis is too stinkin' cute...great block and tutorial!
ReplyDeleteVery cute thanks for sharing.
ReplyDeleteI'm glad you didn't just make a block - it's great to see the process with the quilting and binding. Fun, fun!
ReplyDeleteAdorable!!! I just love all of your ideas. You're so creative =D Thank you for the great tutorial!!!
ReplyDeleteGreat tutorial. Thanks for sharing.
ReplyDeleteOH...you are just too much...I love all your blog posts but this one is great. Glad you made it and shared it with us. Have a great 4th of July! Yeah RED, WHITE and BLUE!
ReplyDeleteHow creative! This is one of the cutest banners (toppers, whatever!) I've ever seen. Marvelous job!!! :)
ReplyDeleteThat is one explosive block. How clever you are. Thank you for the tutorial.
ReplyDeleteAbsolutely awesome!
ReplyDeleteLoved your tutorial and enjoyed a great cuppa's while reading. I hope to make one for my Canada Day next year. Thank s
ReplyDeleteI just LOVE this!! Thanks so much for the tutorial too!!
ReplyDeleteHuggs, Nancy
Adorable! Love the 3-D!!
ReplyDeleteWonderful! How creative.
ReplyDeleteLove the 3D firecracker! An adorable table topper. Nice tut, easy to follow. Thanks for sharing.
ReplyDeleteWOW!! This is ONE IMPRESSIVE BLOCK! It really looks fantastic. You did a great job, but I am really tired now from watching you put the whole thing together. So i think I will take a nap. Have a great day!
ReplyDeleteI love the 3D effect and how clever you are! thanks!
ReplyDeleteThat is just so artistic and creative--you did good! Love it!
ReplyDeleteFantastic idea! And with a few different colours, easily adaptable to any country!
ReplyDeleteThanks
Over the top gorgeous! (pun intended) :) blessings, marlene
ReplyDeleteVery creative! You and Padsworth did a great job.
ReplyDeleteSO awesome!! Thanks for sharing!!
ReplyDeleteOh my gosh, this is so darn cute! How creative and fun!
ReplyDeletewow! love the way an idea percolating in your wee head turned into an explosive mini!! 3-D fun!
ReplyDeleteWow!! That is an amazing block!! Thanks for the wonderful tutorial too!!
ReplyDeleteFantastic, love your creativity!
ReplyDeleteYou are so smart! What an awesome block!!!
ReplyDeleteGreat block! Thanks for the tutorial!
ReplyDeleteThat idea is brilliant. You did such a great reproduction of it too.
ReplyDeleteWhat a fun, and very creative, block!!! Thanks for the tutorial!!
ReplyDeleteOh My Goodness sakes Alive, that is THE bestest block ever in the whole wide world...until I see another one...Ha!! I REALLY like your block!! Very creative. You should PIN this!!
ReplyDeleteHappy 4th of July
God Bless America
Gmama Jane
Oh, Ms. Snoodles - that is just delightful! And considering that there are 9 wildfires burning around my state today, this block is the perfect alternative to fireworks. Love the "smoke".
ReplyDeleteThis lights up the sky! I always love stopping by. Judith, Texas
ReplyDeleteWow! Too cool! I love it!
ReplyDeleteHappy Hop Day!! 3-D, amazing!! So fun! You did a great job and the tutorial is so good. Thank you for taking the time to show us this fun block. And I agree; with all the brush-fires a great way to see fireworks!
ReplyDeleteSo fun!! Thank you for sharing this block!!
ReplyDeletefacinating! a great tute! looks like a fun project!
ReplyDeleteSo cute and creative. Great job!
ReplyDeleteCreative. I think I can do that.
ReplyDeleteThanks for sharing.
Very fun and creative...love the effect of the rickrack
ReplyDeleteBANG!! great 3-d effect with your fun block.
ReplyDeleteThis is just adorable and the tutorial is great. Thank you.
ReplyDeleteAurea Gillis
This is just adorable and the tutorial is great. Thank you.
ReplyDeleteAurea Gillis
Wow! You really went into great detail for us. What a great looking block. Thank you.
ReplyDeleteThanks for a fun and thorough tutorial. This is one of the mst creative ideas I have seen in a long time. Thanks for being so generous to share.
ReplyDeleteThanks for a fun and thorough tutorial. This is one of the mst creative ideas I have seen in a long time. Thanks for being so generous to share.
ReplyDeleteWOW how neat!! Great block and tutorial!
ReplyDeleteHoly Firecracker Batman! This is unbelievable! I don't know why I'm surprised, you continually amaze me.
ReplyDeleteWow! very cool :) Perfect Fourth of July table topper!! Excellent job and thank you for sharing ....
ReplyDeleteSo original. Awesome post. Thanks for the inspiration!
ReplyDeleteI love it! Oh my goodness, it is just Sew Cute!! You are SO creative. You and Padsworth did such a fine job on the tutorial too!!
ReplyDeleteHappy Fourth to you and your whole 'fambilee', which me loves a lot!!
Thing I
Love the super fun firecracker idea!!!!
ReplyDeleteVery cute :)
ReplyDeleteThanks for sharing it!
Wow, what a fun and very creative block. Your tutorial is great, thanks for sharing.
ReplyDeleteVery cute! Great interpretation of a firecracker! Thanks for sharing the "how".
ReplyDeleteVery clever! Thank you for sharing your RWB firecracker block!
ReplyDeleteI love your firecracker quilt table topper thank you for sharing it!
ReplyDeleteI'm glad you made the wrong thing - this is gorgeous!
ReplyDeleteThat is the most adorable thing I've seen. I wish I could come up with ideas like that.
ReplyDeleteOh my gosh! That is just about the cutest thing I have ever seen! I love 3-D quilts. You hit it out of the ballpark!
ReplyDeleteLove the 3D block! You are very clever! Thanks for sharing!
ReplyDeleteHow fun! I've never seen a 3D block before - the end result is very cool.
ReplyDeleteUnbelievable!! I started the list from the bottom saw Elaine's blocks on Jane's blogs saying they explode like fireworks not just a pop. Well here are the fireworks. Thank you so much for the block explosion.
ReplyDeletetotally awesome and 3D in every way!!!! I SIMPLE LOVE IT!!!
ReplyDeleteWhat a neat block. Love how you used the batting to look like "smoke". So clever! Thanks for a great tutorial. Have a safe and happy 4th!
ReplyDeleteFrom where my lilypad is, I can see this is a very sweet little project. I really appreciate your "turn of mind" and the way you presented the whole thing. You're really thinking outside the .... pond ......! Thanks for letting us visit and share your corner of the quilting pool.....
ReplyDeleteOh my gosh is this ever fun! I love it!
ReplyDeleteRunning behind on my visiting. Bad storms knocked my power out the last couple of days. Poo!
Hugs!
Sooo very creative! Well done!
ReplyDeleteThis is a fun, inventive wall hanging! So fun!
ReplyDeleteWow, what a fun block. You were definitely inspired!
ReplyDeleteHow wonderful! Love your 3-D block and appreciate you making it into a tutorial for us to make our own. What a perfect mini for celebrating!
ReplyDeletegreat block - really packs a punch !
ReplyDelete