Monday, July 9, 2012

A postcard from Annie!


. . . we interrupt our regular programming to report that unusual seismic activity has occurred in the southeastern US.  Geologists are reluctant to classify this phenomenon as an earthquake or a temblor, due to the rhythmic quality and short nature of the seismic outburst . . .

(Blushing) Actually, I'm the cause of the excitement. Yep. Just me. Opening an envelope and discovering the absolutely most adorable fabric postcard I think I have ever seen:


That fabric and thread artistry is from Annie of Freeze Frame fame --- say that three times FAST! I dare you!  Actually the name of her blog is Annie's Musings, and she has some interesting things to say, and some lovely projects to share!

Lately she has been on a pillow spree, and her latest one just made its way onto my "to-do" list! Check out the fun by clicking here and scrolling down to see her latest pillow.

I digress, though. Back to my causing consternation at the geological facility . . . I was so thrilled when I pulled out my post card that I started jumping up and down. Can you blame me? It is so cute! Annie sure knows what I like! (Grin)  Padsworth was so pleased and thought it was a great likeness of him!

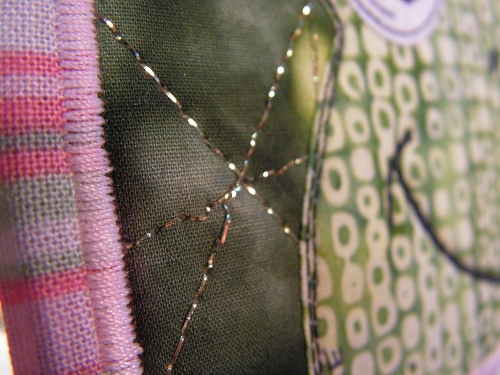
She does great work, too. The stitching on the little frame around the froggie, the narrow binding, is so precise. And can you see the bling? Here, I 'll show you a close up:


Gorgeous metallic thread! (She is very brave, too. I am too "skeert" to try metallic thread!) 

Thank you, Annie, for my wonderful fabric postcard! I really am glad that I asked for it to be sent safely nestled in an envelope -- I would have been very sad if he was marked or damaged on his trip to me! Thank you for such a cute froggie!

Now, y'all be sure to hop over and see what Annie has been up to lately, ya hear?

Love,


Saturday, July 7, 2012

All the way from Malaysia....


One of the really cool things about SewMamaSew giveaway day is that you are able to visit blogs from all over the world. I always find it a lot of fun to see what quilters and crafters on the other side of the globe are doing!


In May I won an adorable giveaway from Grace at WhimsyLoft -- she has a blog and a wonderful shop, which you can zip over to, by clicking on those linkies.


Here is what she sent to me:


Oh! I forgot, that is such a closeup of the cute fabric, that you can't quite tell what it is..... How about this one?


You guessed it, it is a sweet pouch with a snappy closure --- which Padsworth managed to get himself caught in, right away!
Here is what he was rooting around in there to pull out:


Some cute fabric with iron-on already applied, and some darling stick-on hearts! What fun to add those to projects!
I particularly like the fabric she chose for the inside:


Her workmanship was stellar -- I love my new pouch! I hope you will click on those links up there, and check out her shop . . . she has some lovely things to offer!  She has some really cute tutorials on her blog, too! Go and visit!


Have a wonderful weekend!


Love,


Thursday, July 5, 2012

Are those jingle bells that I hear?


Well, I do declare, I believe those ARE jingle bells . . . Padsworth and I are happy to have a guest poster today, and we are declaring this to be a "Christmas prep" day, today!  After all, you want to be prepared for all the festivities, right? (Grin)

We saw a wonderful project on Belinda's blog, The Seam Rippers, and we asked her to put together a tutorial, for all of you wonderful Lilypadquilting peeps!  So, we'll turn it over to Belinda, and let her take it away!


Hello from Arkansas!! My name is Belinda and my daughter and I share a blog called The Seam Rippers. We do a bit of sewing, quilting, painting and the odd craft from time to time. When Snoodles first asked me to be a guest  on her blog, I was a little unsettled as I'm OK with doing things on my own blog, but on someone else's...not so much. She was very encouraging and so without further ado, here is my Christmas tutorial for July.

Embroidery Hoop Ornament


Gather your supplies listed below:

fabric
felt
embroidery hoop
ribbon
scissors
cording
hot glue and gun
pattern
puffy or slick paint

Optional supplies:
Acrylic paints and brush (you may want to paint your hoop red or green)
needle and embroidery thread (to outline your pattern or hand applique instead of hot glue)
embellishments of your choice (floral picks, buttons, studs, gems, etc.)


Cut a circle larger than the outside hoop and if desired, mark with a watercolor pencil or disappearing ink pen. Make sure your pattern fits inside the circle with plenty of space around it. I like to use children's coloring pages for pattern ideas, and sometimes I just free hand something.


Cut your designs out of felt or fabric of your choosing. I like the felt because it gives it a little more texture and doesn't fray.  We are doing a gingerbread man today.


Choose which embellishments you want and begin the fun stuff by hot gluing the cut out to the fabric in the center of the hoop. You can also stitch your design on, and this gives it a different style and dimension. 


Using puff or slick paint, create your man's features and let dry completely. To make the little heart, I put two round drops side by side, then take a straight pin and pull down from each one meeting in the middle underneath. You can see where I practiced on the paper.


Tie a loop in your cording, wrap around the screw at the top of the hoop and secure with hot glue. Then tie your ribbon around the screw and start adding your embellishments, hot gluing to keep them in place.


I finish it off by hot gluing rick-rack around the edge and covering the back with more fabric to give it a cleaner look. Just glue it on and trim.


The possibilities are endless and it's great fun to find new designs to try. This is a project that doesn't take much time or money and I hope you enjoyed learning about it!

Thanks for inviting me Snoodles!! Merry Christmas in July!!

Hi, It's Snoodles, back again! Aren't those adorable? I can see several of those in my future! Thanks ever so much, Belinda, for putting together a tutorial for us, and showing us how it's done! 

I hope y'all will leave her a comment and let her know if you liked her project -- and maybe take a quick hop over to her blog and say "howdy" over there!

We'll be back soon with more fun!

Love,


Wednesday, July 4, 2012

Happy Fourth of July!

Padsworth and I would like to wish all of you a very happy and safe July 4th holiday!


That's a snappy salute from Padsworth, isn't it? He's a patriotic little guy, and he wanted me to be sure to tell you:  Find a veteran or a serviceperson today, and tell them "thanks" for the liberties and freedom that we all enjoy!

We'll see you "on the flip side" for some Christmas shenanigans on Thursday!  Yes, Christmas! We even have a guest poster lined up, so be sure to hop on by!

Love,

Monday, July 2, 2012

Welcome, Red-White-and-Blue Hoppers!


Welcome, to all of you special Lilypadquilting peeps, and to you special blog hop visitors, too!  I must warn you . . . I get a little carried away sometimes, and I think this is one of them. When you put me, fabric, my machine, and a camera in the same room? Well, ya had better stand back! (Grin)

Thank you, Madame Samm, for cheerleading for Jane and all of us --- Jane did a great job of organizing this, and I'm thrilled to be participating. Want to see what I made? Do ya? Huh?  Well, here you go . . . 
Here in all it's 3D spiffiness, is my "Firecracker Block" for your consideration.


Yes, I admit it, I thought we were supposed to make a table topper, so my 12.5 inch block is finished that way. (Grin)

Now, would you like to know how to make one of your very own? Well, sit yourself down (move over, Lilypad regulars, and make some room) and grab a cuppa (we have tea and coffee for you) and make sure you have a snack ('cos it's gonna be a while).

This was my inspiration for this block -- at least, that's what I thought of, and this is the closest image I could find, to show you what was percolating in my wee head.


An old-fashioned fire cracker, right in the middle of explodin'!! So, how to make one? And what to do with it when we're done? I'll show you both!
I rummaged around in my stash and found some patriotic red, white, and blue fat quarters -- but you don't need that much; just scraps will do. I drew a pattern freehand (and if you would like one, just click here to go to my file cabinet over at Google Docs and you can have one!) and cut out my pieces. 

Here you see the pieces for the larger half of the firecracker. These will form the outside of the unit:

Now here are the "lining" pieces, that will show because the firecracker is exploding, and the edges of the cylinder that held the powder are being blown back, and will show.


You will see on the pattern a dotted line . . . the lining doesn't have to go all the way inside the firecracker, because it will only show here at the opening. 
Be careful to flip the pattern pieces over when you cut out the lining, because you will put the pieces wrong sides together, like this:


Here are the pieces that I cut out for the smaller part of the firecracker. I know this may be confusing. Breathe deeply. Relax. Work with me here, OK? It will be alright. (Wink)


This will all become more clear when we start putting things together! And to do that, I found some iron-on Pellon that did the trick. See? Just trace your pattern on here, 


Then iron it to the outside or the lining.
And then I used my trusty lapel stick to join the other fabric to the unit.


I didn't worry about the raw edges, because this is supposed to be explodin', ya know! That will just add a little realism!  


Now it was time to put the firecracker pieces together and stitch up the tube -- lay them like this and stitch those long sides. 
This is what you have now:


I didn't want to be worrying about the lapel stick bond, so I stitched around those edges. This will also make it easier to "curl" the pieces later.
Now, you have to put something in there to plump up this firecracker, and it just so happens that some poly-fil will work nicely, as well as be artsy when we start adjusting things later on, so . . .
Using my handy-dandy-super-specialized-tool, I packed some in there, and left a fair amount hanging out the opening. (Don't you love it when I am so specific about how much of something you should use?) 
Now it's time to close up the end. Refer back to the picture above if you need to. You want us to wait? OK, I'll go get another cuppa.
You're back! Take your circle of "outside" fabric and (right sides together) hand-stitch it to the end of the tube. Start on one side, like so:


You can pin it if you like, but just keep going around, turning under about a quarter of an inch, and then you will have this:


It's time to start on the other end of the firecracker, OK? 


Put your "outside" and your "inside" or lining fabric together in the same way that we did before:


You can see up above that the Pellon is ironed onto the red fabric, and then I used the Lapel Stick to join the starred fabric to the red.
Second verse, like the first!
I forgot to say that when you stitch the "tube" you should turn and stitch to the edge where it shows that on the pattern:


When you finish stuffing the second one, you'll have two parts that look something like this:


Now it's time to add some embellishments . . .


I pulled out some rick rack, and cut some stars out of another fabric. You can lay the parts of the firecrackers on your block --- oh, I forgot to tell you to cut a 12.5 inch square of fabric, didn't I? Plumb inconsiderate of me, don'tcha know? You can choose whatever you like -- I chose a white on white that I had handy. Lay the firecracker sections out and decide which way you'll be sewing them down . . . but don't do it yet!  


Pin your rick rack where you think you will want it; I used mine to make arcs that would show some movement. I laid the block on top of the batting at this point, and sewed the rick rack down.
After that, I did some free motion quilting around those arcs and stars, and when that was done, I made a narrow binding. Here is how it looked when I finished that step:


It was time to attach the firecracker to the block! Using tiny stitches and burying the thread so it would not be seen, I started from the back and stitched that bad boy down.


I wanted to have it almost "pop" off the block, and create shadows, too, so I turned some of the frayed parts under, and stitched those in place. Also, there are some frayed parts that are stitched back onto the firecracker itself, to make it stay "open."  See?


Here is the large section of the firecracker, stitched into place:


I used a needle to gently pull the batting, to make certain that it was thin and wispy, like the smoke from a little explosion. I also added some yellow rick rack to add a little more fiery color:


Padsworth is pointing to the yellow rick rack --- he wants you to admire that:


Here's another close up --- I love how the pieces stand out and have shadows under them!


So, here is the finished project -- my Firecracker quilt block!


I can see using this as a quilt-as-you-go block, and putting four of them together to make an "explosively" colorful wall hanging!

I hope you enjoyed your visit to Lilypadquilting -- it's a hoppening place, and we have a lot of fun here!

Be sure to visit the other bloggers who are offering blocks today:

And be sure to check with Jane at her blog, to get the whole schedule. You can click where it says "Master schedule" to find the whole list! You are sure to be inspired and find lots of new projects to enjoy!


Love,