Showing posts with label bloggers quilt festival. Show all posts

Friday, May 17, 2013

Bloggers Quilt Festival - Spring 2013

AmysCreativeSide.com

First of all, many, many thanks to the talented and creative Amy Ellis of Amy's Creative Side blog....it is a huge undertaking to coordinate this festival, and she is a busy mom and book author, too! (Waving) Thanks, Amy!

Now, down to business . . .

Welcome to all of you who are making your first visit here at the Lilypad! I'm showing (or re-showing, I guess you would say) my Happy Town quilt, made from a panel and an original design topper, from Jacquelynne Steves' fabrics . . .

Here is the whole quilt, showing the 'dozer, tow truck, letters and balloons that I designed for the top of the panel:


Here is the back -- charm squares cut from the coordinating fabrics for the panel:


The binding turned out great with the striped fabric:


I loved quilting this on my home machine, making lines in the roadways and stippling in the town areas:


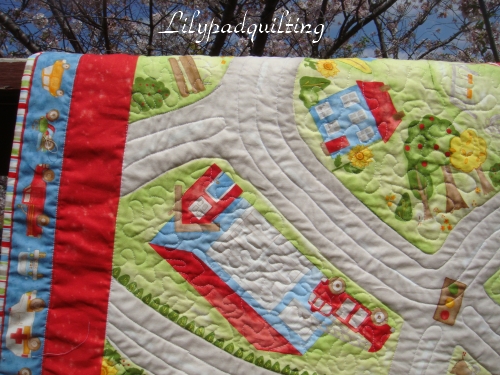

Closeups of the "heavy equipment" for you to see:


This was a fun quilt to make, and it was donated to the Quilts For Kids group, to go to a hospitalized child for fun bed playtimes.


Thanks for stopping by today, and be sure to check out all of the other quilts in the Festival!!  You might even want to enter in one of the many categories, and try to win a super prize!

Love,


Friday, October 26, 2012

Blogger's Quilt Festival starts today!


It's here! It's here! It's finally here!

Can you tell that I'm excited?

The Fall Blogger's Quilt Festival is here, and you can enter it, too! Just pop over to Amy's blog and join the linky party!

I'm entering my mini-quilt that you see in the picture below:


I created this in July for a blog hop, and it has lots of three-dimensional interest. You'll have to excuse Padsworth there....our popular mascot for this blog loves to photo-bomb, and get into the pictures! (Grin)

This mini measures twelve inches square, and the background is free motion quilted to show the movement from the firecracker's explosion!
You can visit this link to see a full tutorial on how to make the mini -- here are a couple of highlights for you:


Cutting out some fabric pieces for the firecracker . . .


Stuffing the firecracker with polyfil . . . 


Placing the rickrack and then quilting the project . . .


After binding, placing the firecracker just so . . . 

A few added touches like mini-rick rack for more color, and to add to the explosion!


 See the shadows from the three dimensional pieces? I love it!


Padsworth loves it, too!

That's my entry for the festival. I hope you enjoyed seeing a little of how it was made, and I hope you will check out the linky party at Amy's place.

Quilt Festival Stats:
Finished mini measures 12" x 12"
Special techniques: 3D embellishments
Quilted by: Snoodles (with help from Padsworth)
Category: Mini-quilts
BQF # 69
    
I'm hoping that maybe I'll be nominated for a prize . . . we'll see how it goes! There are always wonderful quilts to see in the festival!
See ya there!

Love,


Friday, May 18, 2012

Bloggers Quilt Festival - My Art Quilt!

Hi everybody!  I'm entering the Bloggers Quilt Festival, hosted by Amy over at Amy's Creative Side. 
I thought I would tell you the story behind my art quilt.
I was so excited to guest post this spring at Jackie's Art Quilts! When Jackie asked me to prepare a guest post, I had a lot of conflicting emotions --- I was happy, but I was also intimidated! I think she is an awesome art quilter, and I love seeing her creations here on the blog!

Jackie, Sunni (from Love Affair with my Brother) and I had all posted tutorials here at the Lilypad, for 3D embellishments for tote bags and other projects that needed a little WOW! added to them. (If you would like to check them out, you can click on the Tutorial page here at the Lilypad.) We had a ball, and I was still thinking along those lines when I came up with the idea for a 3Dimensional art quilt. I call this wallhanging "Spring Dreams" and I like how it turned out!


(If you would like to create your own Spring Dreams just head over to my tutorials page, and you'll find all of the instructions there.)

To make the long story short, I "created" some fabric for the background, with a "wonky" way of piecing different fabrics together, and then I dreamed up some flowers that would be 3 dimensional, instead of flat on the background.

Check out these blooms:


I added stems for the large flowers, and made loopy leaves for them, as well.
I wasn't finished yet, though! I stitched some little butterflies in the open areas, just because I like butterflies!


So, my art quilt was done. I was exhausted from "stretching my boundaries" but doing something new is a very good thing, I decided. At least once in a while.


I'm so glad that you came to visit with me during the Bloggers Quilt Festival!

Be sure to go to Amy's Creative Side and check out all of the wonderful quilts and projects linked up there!


Love,


Friday, October 28, 2011

Bloggers' Quilt Festival! I'm In!!

Amy'sCreativeSide

I'm joining in on the Bloggers' Quilt Festival, organized by Amy's Creative Side. Thanks so much, Amy, for hosting this event!

I'm excited to be part of this, and if you haven't heard about it, or would like to join in, just click on that button, and you can find out all about it!

My entry is a quilt that I made, as a participant in the Hands to Help project. This was a group of quilters who swapped fabrics and then made quilts for the Green Fairy Quilt Ministry. Judi and Clint take a trip each year to Romania, and distribute quilts and school supplies there.

These are the fabrics that my partner sent to me:


And here is my quilt; I named it Stars over Romania:


Here is how I put it together and tried out different colors for the lattice.... I tried bright red, then a nice dark teal, like in some of the blocks, and then I settled on the brown. It was just a few clicks of the mouse to make the changes and audition the colors on Ole Frog Eyes!

I love pieced backs, so this is what I put together for the back of this quilt:


Thanks for stopping by -- I hope you enjoyed this stop on the Festival tour, and I hope that you'll join us and show off one of your quilts, too!

Love,