
It's that time of year again!! Lots of ho-ho-ho-ing, and jingle bells, and prancing little feet (will you PLEASE get out of my sewing room? I have surprises in here). Bet you thought I was talking about reindeer, didn't you?

In case you are searching for ideas for small gifts that can be whipped out in that final frenzy before the holidays, this might be just the thing. Or, if you are one of those
I always believe in giving credit where credit is due, and I need to tell you right off the bat that I got this idea from another blogger, and adapted it. I have no clue if she was the first to think of these cuties, but the original idea is from this post and I simply made it charm pack friendly! (Gotta love those pre-cuts --- what did we do before them?) When you finish, you'll have a lovely wallet to put singles of tea and coffee (yes, you can get coffee that way, too, now!) into, so that the lucky recipient is prepared at a moment's notice for a Java or tea break!

Ready? Oh, wait. This one is going to have lots of instructions, and photos. Better get a snack to sustain us...

First thing you need to do is grab a charm pack of materials that you don't mind cutting into. I know, I know, that is difficult, but you really can't keep them forever. Pat it lovingly and lay it down on the

Next you will summon up all of your

Ain't they cute? Now you're going to mix 'em up and sew six of them together! Part of the insanity, in some people's minds . . ."Quilting? Oh, yeah, you cut up perfectly good fabric and then sew it together again!" Uh-huh. And what might your hobby be? I like mine!

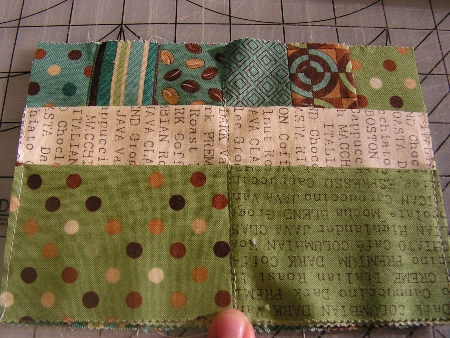
The picture above shows the strips sewn together into what we'll call The Outside (we're quite technical here, and very precise in our terminologies). You'll want to trim them to a 5 x 7 rectangle, and then lay that on top of The Batting, as you see there. How to trim to a 5 x 7? Well, you know that here at Lilypadquilting and at OleFrogEyes, too, we are all about cool tools! Check this out!

Those of you that are muttering to yourselves about it being cardboard covered with duct tape are per-zackly right! Heck, I think that duct tape is probably one of the most necessary things in my house. I'd hate to think of all the things that wouldn't be useable if they weren't repaired with this silvery-gray miracle! Stack up a couple of pieces of corrugated cardboard cut to 5 x 7, and wrap 'em up with tape and you have your Magic Template.
Now, when you have The Outside made, lay it on top of the rectangle of batting, and quilt as desired. Sometimes I just do "stitch in the ditch" along the seams, and sometimes I go a little bonkers with my machine (my sweet sis gave it to me) and do a little of this:

('Scuse me whilst I slurp up some tea . . . I don't usually talk so much!) Now, the next step is to make The Inside (rectangle) in the same way as you did the outside: cut the strips, sew six together, and lay them aside.
Next we need pockets. Wallets have pockets. It's just been that way since the world began. Don't fight it.
Take two charms and lay them right sides together, and stitch a quarter inch seam, then press. Here's what I got:

(You'll have to forgive the pressed fold there . . . I scooted ahead and had to come back to this step!) So, you have two charms joined, and you are going to fold that in half, wrong sides together, and press.

Now haul out your trusty template again, and make sure that this new piece is just 7 inches across longways. Go ahead, just trim a little off the sides.
For the other pockets, I used a fat quarter of coordinating fabric, and made a pocket out of that, too. Same measurements; second verse just like the first. Here is what that one looked like. Well, it has two friends that look just like it. That's because I had a lil assembly-line action going on here, and I was making three at a time!

Now you'll need to lay one of your pockets on The Inside, one inch up from the bottom. Here's a picture to make that more clear:

See? Just lay your little ruler there, so that the one inch line is at the bottom edge of The Inside, and put your pocket right at the top edge of the ruler. Your other pocket will be snuggled up at the edge, like this:

Now you'll want to pin it carefully and stitch on the far right edge and the far left edge. I usually use about a one-eighth inch seam.
Here is what you will have then:
See the stitching on the right and the left? And right in the middle, where you see my chubby little finger, is where you will stitch from the bottom, just to the top of the upper pocket. That line of stitches is dividing the two pockets into four --- pretty clever, ay? (You can click on the picture to em-biggen it, and you'll see what I'm telling you about.)
At this point, you will want to make the loop that holds the wallet closed. Start with one of your 1.5 inch strips that was left over, and fold it in half lengthwise. Make sure the right sides are together like this:

After you press it, open it out, and fold the raw edges in, to touch the pressed line. Press again, but be careful that you don't press your chubby finger. Don't ask me how I know to warn you about this. This is what you end up with:

Now you can fold it into a loop and baste it on the edge of The Inside of the wallet. Make sure the loopy part (see that precise terminology again?) is over in the middle of the wallet!

Now you are ready. Take a deep breath and put The Outside and The Inside right sides together, and stitch all the way around except for an opening to turn --- I left about 1.5 inches unsewn, and it worked pretty well. Your wallet should look something like this now:

I guess you could just topstitch now, but I like to hand-sew the opening closed, and then topstitch. It just works better for me. Once you have topstitched around the edges, you can choose a lovely button and sew it onto The Outside, and here is what you have:

Now all you have to do is load 'er up! Choose some tea and coffee singles that you think your special person would enjoy, and pack 'em in there!

I've made several of these, and they have been well received. It is especially nice for folks who work at an office and would like to have some warm comfort during the day, that actually tastes good.....can you really trust that other person to have washed out the coffee maker?
I hope that you enjoyed this tutorial and that you will try this adaptation for a tea and coffee wallet!
Love,

GREETINGS ! thanks for the good gift idea ....
ReplyDeleteLove this idea! I have a friend who drinks tea in the morning instead of coffee and she always brings her tea bags with her. This would be perfect for her. :) blessings, marlene
ReplyDeleteOh wow, I've made a ton of tea wallets for consignment...I didn't realize you could buy single coffee packs! =) too cool.
ReplyDeleteI just love JAVA by Deb Strain! It's beautiful!
Great idea, and wonderful tutorial! I'm wondering how easy it would be to adapt for gift cards, too - a nice place to store them so you don't forget about them.....
ReplyDeleteOh that is great!! I love it =D I especially love the duct tape covered cardboard idea! I never would have thought of that!! Thank you so much for sharing this!!
ReplyDeleteOh, this is a simple gift...thank you!! It could be adapted for gift cards, or needles...or any number of fun things.
ReplyDeleteOh my sweet Sister gave me the secret to the cool wallet she gave me last Christmas!! Whooot!
ReplyDeleteI have a number of employees who would love this, and I like the idea of tucking a gift card in along with the tea/coffee bags....
AWESOME! Love your tutorial and can't wait to try it!
Hugs,
Thing I
p.s. Love what you did when you went "bonkers with your machine", great idea!!
ReplyDeleteThanks for the tutorial! I am leaving for a quilt retreat tomorrow. I will share my cute little tea wallet with friends and share your blog with them too! Thanks!
ReplyDeleteGreat tutorial! I just saw the finished product over at Marcia's blog. Just too cute!
ReplyDeleteI just made 2 for Craftster swaps!
ReplyDelete