Monday, October 8, 2012

A "peach" of a pear . . .

Happy Monday, everyone!

I received a lovely pear pincushion recently as part of a Modern Scraps swap that I really enjoyed. I love my pincushion, and thought it looked like something I could make. I don't have the pattern, so I decided to "wing it" and make one on my own. Does that sound like something you would do?

Here is the shape of the pieces that I cut out:


I ended up tapering the top of the pieces to a more narrow shape, and that worked out pretty well. 

I used some of my wonderful scraps that I received in the swap. I cut out five of those shapes, and then pieced some eensy scraps together for the sixth one.

And this is the pincushion that I made:


The leaves are more of my "lazy" leaves, but this time I folded my fabric over a piece of batting and blanket stitched (free-hand) a leaf shape . . . then I cut close to the stitches, and Voila! Leaves!

The "stem" is a piece of rolled up batting, with fabric stitched around it . . .


I enjoyed making this pincushion, and I'm sending it off to someone special! Stop in tomorrow for more Lilypad fun!

Love,


Saturday, October 6, 2012

3 Dimensional FUN !!

Remember that Christmas wall-hanging that I was working on? I had to put it on hold for a short while, but I'm back to work on it now, and I want to show you something cool. Alright, so I have dated myself there, by saying "cool." At least I didn't say "far out" or "groovy" or something else embarassing. Ahem.

The wall-hanging that I'm speaking of (or is that the wall-hanging of which I speak?) is the one I created from the lovely Jacquelynne Steves Christmas fabrics and panel.


I wanted to make the ornaments around the edge of the panel really pop, so I thought I would try some three dimensional embellishments. I think I mentioned before that I found a quick and easy way to make leaves over at Linda Matthews' blog.
All you do is take a piece of your chosen fabric, and fold it over a piece of fusible web, like steam-a-seam or wonder under. Iron it so that it's all fused nicely, then trace your leaf template onto the fabric. When you cut the leaves out, there will be fabric on both sides, and no need for finishing the edges. Unless you are a sucker for more work and just have to do it. Me? I was quite content with my "lazy leaves."

I found some satin ribbon in my stash, but any ribbon will do if you wish to use this technique. I tied a bow and ran a couple of stitches through it, then tacked the bow and holly leaves to the "hanger" of each ornament ball.

Want to see? Aww, you're so nice. OK, I just happen to have some pictures to show you. (Grin)


See how the leaves and ribbon are sitting up, off the fabric panel? I love it! Look at the shadows behind them . . . to me, that adds a lot of interest to the ornament.


That's a picture of a corner of the wall-hanging, so you can see two ornaments.

Here is a close up of Mr. Mousie, in his cameo role on one of the balls. Please excuse the unclipped threads there. 


And here are two more:


Well, I can hear some of you humming "Jingle Bells" already, so I must have put some of you in the mood to create some Christmas magic! Be sure to check out Jacquelynne's fabrics and enjoy them -- they are so lovely!


Love,


Friday, October 5, 2012

'Chutes away!

Padworth and Dragondrop wanted to show you how to make a parachute today. Not just any ordinary parachute, but one that will survive more than just one throw off the deck!


Did ya get your bears and GI Joes and other masters of daring-do pulled together? Okie dokie, then we are ready!

I can remember making parachutes for action figures out of plastic trash bags, and they were not as much fun as they could be, because of the durability issues!  This one that I'll show you is much better!

First, you are going to need some really thin unbleached muslin. You can use really cheap stuff, because you want it to be as light as possible.
Find your trusty compass (not too hard for me, as a retired homeschooler) and draw a lovely circle. THIS IS IMPORTANT: Do not let your compass slide larger or smaller, once you make your circle. You will see why in a moment.


Take the point of the compass and rest it on your circle -- pick a spot, any spot, it doesn't matter where. We are equal opportunity spot-pickers here. Now, with the point on the circle, make a small mark with your pencil, wherever the pencil comes to....that's not too easy to explain, so there is a picture up there.
Now you can pick up the compass and place the point on your new mark, and keep going around the circle, making little marks --- if you have held your compass tightly, the last mark should coincide with the first spot you placed the point of the compass!


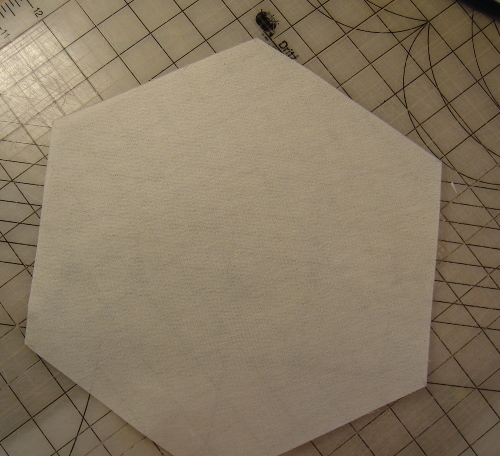
Now you draw lines from one mark on the circle to the next, and keep working your way around the circle. I am probably bringing back nightmares about your first geometry class and the mean teacher you had....after all, I am making you construct a hexagon.
Now you can cut out your hexagon, and sit back and admire it!


Now, I reached into my stash and pulled out my Heat Press Batting Together tape --- you'll have to get some of this stuff --- I find all kinds of uses for it!
Cut short pieces and iron it onto the six points of your hexagon, like so:


Once you have done that, you are ready to snip a small opening in the center of each bonded area, and tie a very light string or thread there. I made mine about ten inches long, but you can adjust yours any way that you like.


Tie good knots, OK? You don't want to be the cause of a tiny paratrooper's injuries . . . (Grin)

When you have all six done, you can tie them all together:


Now it's time to focus on the pack that the parachute will go into. Dragondrop chose some yellow fabric, and I made a small envelope for him:


(You'll have to forgive the photo there; just ignore the chubby fingers and lack of manicure.) Now we need to secure this to our jumper. I got out some thin elastic, and made loops on each side of the envelope.


It doesn't have to be beautiful -- we are more interested in the safety of our trooper than in the loveliness of the completed project.
Now try it on for size:


Hmmmm, looking pretty good! Here's another view:


The last step is to take the strings (you tied them all together, remember?) and stick them a little ways down into the little pack, and stitch them in very securely . . .
Now he's ready for his jump! (Don't worry, Padsworth insisted on putting a blankie and padding down, before giving his approval for the test jump!)


It worked great! We were all so excited that I forgot to take a picture! 
Thanks again, Mhairi, we love our new buddy, Dragondrop!
 
I hope that all of you have enjoyed this post and that it might give you a "jumping off point" for ideas to use for good times with your kids or grandkids! (I know. Very. Bad. Pun.)

Me? I'm off to work on that Christmas wall-hanging . . . I want to show it to you soon!

Love,


Thursday, October 4, 2012

Our new arrival

It is with great hoppiness that Padsworth and I announce the arrival of his new Best Friend Forever . . .  remember when I said his special friend, Mhairi, sent him something from Australia?

Follow along, and I'll tell show you what happened!

Padsworth was out in the yard, enjoying the sunshine and watching the ducks . . .


When what to his wondering eyes should appear -- no, not eight tiny reindeer, but a tiny dragon!


The little dragon "dropped" in, wearing a tiny parachute!


He introduced himself as "Dragondrop" and Padsworth was charmed. Dragondrop said that he had come to help Padsworth with the blog duties, and with the OleFrogEyes virtual design wall, too!


They made a friendship pact, and Padsworth helped him pack his parachute, so he could stay.


(Isn't he adorable?) I absolutely love the little guy -- Mhairi, thank you so much!  I think she did an awesome job, with such little arms and legs and such a cute face!
This is how he came to have the name, Dragondrop: remember a while back, when we announced a new upgrade in capabilities for the OleFrogEyes design wall?
Our software will now allow you to "Drag" and "drop" an uploaded quilt block to any of the spaces on your layout!!
Get it? Drag and drop? (Dragondrop!)

Now look at this cute lil sleeping bag that he arrived in.....


And he'd had a good long sleep on his trip from Australia, so he was a little drowsy, and wanted to hug his blankie:


But soon he was wide awake and 'rarin to go!


Mhairi made him his special blankie, and the fabric has froggies on it! As well as a darling froggy button:


She tucked in the beautiful postcard, and a special giftie for me! Just look at this awesome fat quarter of fabric that I've not seen before!


I'm already thinking up ways to use it!

In case some of you are new followers here at the Lilypad, here is a glimpse of what your quilt can look like, as you build it in cyberspace -- in your very own virtual design wall and gallery, at OleFrogEyes where your friends can look at how your project is coming along:


This, for example, is a table runner that I made last year and featured on the gallery. At that time, if I wanted to move a block -- let's say that I thought there was too much of one color concentrated in one area -- I had to upload the photo again, to a different square on the layout.

Not any more!! (Grin) Due to the diligence of our software department, and the hard work of little Dragondrop, you can now click on the block you wish to move, and drag it to another square!! Easy peasy!


See the little wrench there? That is the signal that you have clicked on your block, and it is ready to move.

Then you can move it, and see how you like it in the new position:


So, if you are constructing a quilt with thirties reproductions and realize you have too much of that bubblegum pink in one area, you can use this to move it around and decide on the perfect layout. Some of the members at OleFrogEyes say that they refer to their design wall to help them when they are putting the blocks together into a quilt top.  They can look over there and see "which block goes next."

Cool, huh? You can zip over to OleFrogEyes if you like, and cruise around the Gallery (just look for the button that says "Gallery" and click on it!) looking at members' quilts. Be sure to check out Joy Denise and Yvette, and also CraftyMamaD --- you'll love their quilts!

I guess this post has gotten pretty long -- I have something fun for you for tomorrow.  Your assignment, should you choose to accept it, is to gather up a few GI Joes, Transformers, or other action figures. Hey, this project will work with CareBears and plushies, too!

Padsworth and DragonDrop say, "See you tomorrow!"
I'm linking up today with Katherine's Corner, and the Thursday Favorite Things hop! (And with her cohost, Susan, at MustLoveJunk) because quilting and software are two of my favorite things!

Love,


Tuesday, October 2, 2012

Growing like weeds

It's a known fact: kids, puppies, kittens, and even ducklings grow up very quickly! It is looking like this might be the last week of duckie fun at our place . . . they are getting their feathers and soon will be ready to go to the lake.

It will be a bittersweet time for us -- we've gotten attached to them! I thought you might like to see them once more. Of course, I'll try to get some photos when we release them at the lake, but ya never know!


The photos above show how their feathers are growing in. A great deal of their backs are still covered by soft down, but their shoulders and chests are getting covered by lovely feathers.

Here's another day in the life of the ducks:


So competitive . . .
Still enjoying the pool:


Still hungry:


Still trying new things:


Still keeping the cat on his toes:


And enjoying the companionship of the dogs:


Hope you enjoyed seeing the ducks again! More quilty stuff tomorrow!

Love,