(Let's get business out of the way first, ok? Some of the links in my blog posts are affiliate links, and if you click on them, I will earn a small commission, but your purchase price won't change a bit! Thanks for clicking through!)
Pinnie?Pressie?
Nope, I'm not talking a new language. (Grin)
Recently I
In the second place, these are just SEW cute!! There's nothing wrong with the ole reliable tomato with the emery-filled strawberry (in fact, I still have one, but it's in sad shape and sits just for display!) but these are so inspiring!
After all, we have scraps, yes?
YES!
And we also have orphan blocks sometimes, yes?
YES!
So why not use some of both, and create happy, colorful places for our pins?
YES!!
(I also have a copy of her newest book, Summer Moon, and I'm planning a quilt along here at the Lilypad to coincide with the fun that starts in May.... blog posts, tutorials, and more from our friends at the Fat Quarter Shop!)
But more on that later.....
.....for now, just let it be said that I'm working up practice blocks as I gather fabrics for that quilt, and instead of letting them languish as orphan blocks, I'm going to use them as the basis of pin cushions or "pinnies."
Here is the first practice one, an album block:
Here it is all trimmed up:
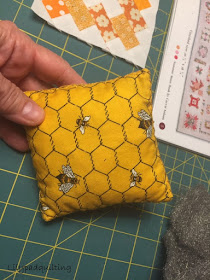
I used a thin batting and quilted by hand -- outlining the pieces with Aurifil 50 weight thread. Then, I chose a charm square of a coordinating fabric for the back of the pincushion:
As I stitched around, I made certain that my corners would turn nicely by stitching three stitches across the corner, instead of making a true ninety degree turn. I put a layer of steel wool inside so that every time pins and needles get poked in, they get a nice sharpening!
Then, to hide the stitched "turn spot" and also to add a cute touch, I dusted the cobwebs off my embroidery skills and did a feather stitch around the pincushion.
I forgot to say that when I handquilted the little block, I added the birthday girl's name in the album spot.
I think it turned out really cute, and I'm looking forward to using more of Carrie's tips from the book as I make more pincushions!
I hope you will take a peek at her book -- oh, and especially check out the Summer Moon book. I'll be posting soon about the upcoming quilt along!
Happy birthday, sis!
Love,


That Summer Moon is becoming popular...love your pin cushion and how it was finished out.
ReplyDeleteThe Birthday Girl adores her pincushion! Thank you Sister!!! Love you oh sew much..... now I am going to contemplate that Summer Moon I'm hearing about. Because, you know, I need another project, right?! Heehee! You are an Enabler of the Best Kind!!
ReplyDeleteThis comment has been removed by a blog administrator.
ReplyDeleteThis comment has been removed by a blog administrator.
ReplyDeleteThis comment has been removed by a blog administrator.
ReplyDeleteThis comment has been removed by a blog administrator.
ReplyDeleteThis comment has been removed by a blog administrator.
ReplyDeleteThis comment has been removed by a blog administrator.
ReplyDelete